
Towards the end of last year, I was thinking about getting a 3D printer to make toys for my daughter and to design some things for myself. I originally planned to buy an i3 3D printer, but considering that I have four cats at home and I was worried they might get burned, I decided to research enclosed machines. I found that many people highly recommended the Voron printer, so I decided to jump into this 3D printing world.

I learned that the Voron has a corexy structure, with four motors driving the z-axis and two motors working together to control the xy-axis. The design of this printer is really clever.
Since I’m not an experienced 3D printer user, I chose the Voron 2.4 R2 300 size, which meets most of my requirements. Then, I started the lengthy process of buying materials.
The materials are actually easy to buy; there are bill of materials (BOM) lists to follow. However, there are many different types of components, which made the selection process a bit confusing. I didn’t know much about 3D printing, so I ended up buying some things incorrectly or missing some components, which led to additional purchases and waiting.
I basically learned about each part’s purpose while installing them. By the time I finished installing everything, I understood how it all worked.
Most of my learning throughout this process came from a Bilibili user named “我是小一灰” and the experts in his 3D printing group, as well as the official Voron website.
Many experts in the 3D printing group didn’t recommend beginners to directly build a Voron printer, as it could be challenging and may lead to unfinished projects. However, with a patient mindset, I decided to give it a try.
Building Process:
There are plenty of online resources for building Voron printers, so I just documented some of the steps during the build process.

To save money, I purchased domestically-made aluminum extrusions instead of the more expensive Misumi ones. Looking back, I regret not spending a little more for the colorful anodized aluminum extrusions, just for the aesthetics.
Since I didn’t have any 3D printing experience and didn’t own any structural components, I had someone else 3D print the structural parts for me.

The frame assembly was simple; I just needed to ensure it was vertical and used thread locker on the screws.

For the four z-axis motor mounts, I had to install threaded inserts into the holes. I have to say, this was quite therapeutic.

4Z motor mount, installation of pulleys and motors, and I also opted for affordable used Moons motors for the motors.

Next, I assembled the z-axis bottom mounts, the bottom plate, and the linear rails. I even had to disassemble the bottom plate once to apply some adhesive films for better appearance.

I installed the top idlers for the z-axis.

After that, I mounted the frame and also installed the AB motor mounts.

I installed the linear rails. I chose the Hiwin brand, and it was really convenient since they sell kits with all the necessary parts.

I assembled the gantry, and adjusting it took a bit of effort to make it smooth and square. I had to make some adjustments later.

I hung the gantry, installed the 4z belts, but the installation was a bit tricky and ended up being slightly crooked. I had to reinstall it properly.

Once the belts were in place, I tested the gantry for smooth movement.

I received a new Voron Tap, but I had already installed standard structural parts before. I was planning to use Klicky to level it, but halfway through, the Tap broke. So, I had to order more parts and install them again. Inside the Tap, there were some ball bearings that fell out during installation, but luckily, I caught them with a box and reinstalled them.

For the extruder, I went with a more budget-friendly option, the BMG extruder. I removed the gear assembly and just threw it into the structural parts. If I have higher demands in the future, I’ll consider getting a genuine E3D Hemera or another extruder.

Of course, I chose the stylish Slice Engineering hotend, which consists of the hotend, extruder, and fan light housing.

Next was the electrical part. I noticed that the colors of the sockets were mixed up.

I assembled the Slice Engineering hotend. Wiring the harness was quite troublesome, especially after changing the Tap. I had to change the voltage for Z leveling from 24V to 5V and make some flying wires.
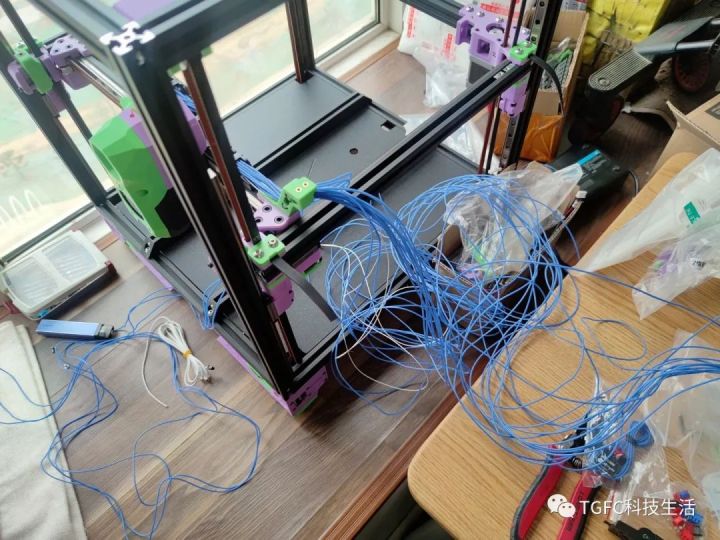
Then, I started the wiring, which was quite challenging. Figuring out how to fit all the wires from the distribution board into the cable chains was difficult. In the future, I might consider switching to a CAN board for better integration.

From the distribution board to the electrical enclosure, three cable chains were used, including internal thermistors and AB motor cables. I didn’t plan to install a camera, so I skipped that part.

Now, let’s talk about the electrical enclosure.
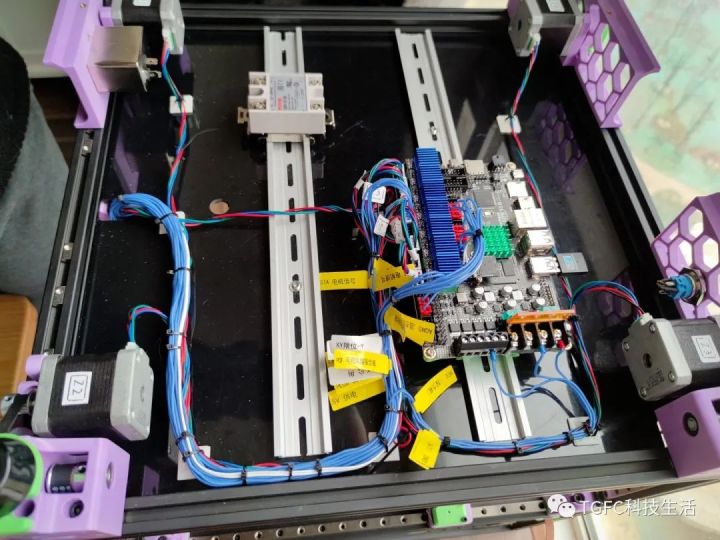
I noticed that many people used cable ducts to make the enclosure more organized. However, I decided to use cable ties because I like this unconventional style, and my aluminum plate belongs to the top-down integrated model, so the electrical enclosure looked spacious.

Although the assembly manual suggests installing the heated bed after completing the frame, I decided to install it last because it’s heavy. This was probably the most expensive component I had to buy. It’s an aluminum plate from MPX.

The electrical enclosure was basically finished. I received the aluminum extrusion covers and used them to cover the AB motor cables.

For the printer’s bed, I chose a stainless steel plate since it’s a consumable part. I also got a PEI sheet for future experimentation.

I printed my first test object, a cube that looked like it was made of high-tech minerals.

After two days of calibration, the printer was basically usable. I installed the backplate and the filament filter. Considering that I’ll be adding RGB lights and a brush head cleaning module later, I decided not to close the enclosure for now. Besides, I don’t plan to print with ABS, so the enclosure is mainly for keeping my cats out.
After calibrating the printer, the print quality was almost as expected. I’ll fine-tune it later.

I was eager to print something, so I printed a dragon with color-changing silk filament, which turned out pretty good.


Afterward, I printed a base, which my daughter really liked. It looks like my daughter’s toys have found a new home.
So far, I’ve finished assembling the printer. Next, I’ll learn SolidWorks and design some structures for myself.
Voron is truly an amazing project. The designers put everything in the hands of the users. As long as you follow the bill of materials and the installation guide to purchase standard components, you can build an excellent 3D printer.
As for future projects, I might consider a multi-material setup (laughs) or building a Voron 0.2 for a friend.
After a few days of tinkering, I installed RGB lights, which improved the performance (laughs).

Some Advice on Buying a 3D Printer:
Regarding the price, it mainly depends on the quality of the components you choose. For example, whether you choose domestic or imported aluminum extrusions, Lin Engineering or Hiwin linear rails, generic or brand-name bearings, and whether you take advantage of discounts like the 618 shopping festival. Apart from the cost of 3D printed parts, I estimate that the cost can be lowered to around $350 for a low-end setup and can go much higher for high-end setups with CNC anodized aluminum, hollow gantry, and various high-end components.
In terms of required skills, I think being meticulous and patient are important, but you don’t need a lot of technical expertise. There’s nothing too difficult in the hardware department; it’s mostly about being meticulous and making sure everything is square and level. In the electronics department, some basic knowledge is required, like understanding the concept of zero line and live wire for high-voltage components and recognizing positive and negative signals for low-voltage components. As for software, I’m not familiar with it; I just copied what others did. Whenever I didn’t understand something, I would search for information and learn as I went along.